Chemical-Mechanical Surface Polishing to Improve Mechanical Performance and Corrosion Resistance
By : Dr. Agustin Diaz ,

By : Dr. Agustin Diaz ,
The first paper presented in this session came from Agustin Diaz and Patrick McFadden from REM Surface Engineering, USA, and Matias Garcia-Avila and John Scovill of ATI Specialty Materials, USA, and addressed the surface texture optimisation of metal additively manufactured components by chemical-mechanical polishing to improve mechanical and corrosion resistance [1].
Fatigue performance and corrosion resistance requirements are two of the most problematic aspects in the Additive Manufacturing field. The main reasons for failures in these two aspects are the close relationship between surface texture and the usual surface-related defects (SRD), such as partially melted/sintered powder, v-notches, remnants of melt pools (fish scaling), and remaining support structures. These defects can reduce corrosion performance and cause fracture initiation sites. For most medical, aerospace, space exploration, and many other applications, these defects can limit applicability.
The main objective of the reported study was to showcase a combination of surface finishing techniques developed for metal AM workpieces, capable of improving surface waviness, roughness, corrosion resistance, and mechanical properties under cyclic loading.

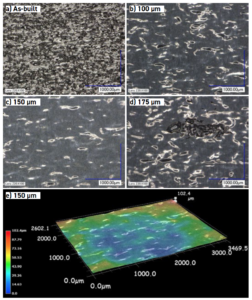
Microscope images at 100 X magnification of the surface texture progression at different levels of surface material removal of PBF-LB (Ti-6Al-4V), with near-surface porosity problems exposed during the CP process (a–d), and 3D microscope image of the surface at 150 μm surface metal removal (e) [1]
The other aspect that compromises structural integrity of PBF components is the accumulation of sub-surface porosity at the near surface. A contour scan, comprising one or more electron or laser beam passes, can be employed during the build process to delimit the part surface from the part’s internal structure. When the contour process parameters are not optimised, sub-surface porosity is generated, reducing the relative density of the material and compromising mechanical performance. Also, there are instances where the issue is not within the contour scan line, but, instead, is within the overlapping settings between the contour and the hatching pass. Failure to produce a successful overlap between these two passes causes sub-surface porosity and lack of fusion at the near-surface. However, this internal porosity can be healed with a proper Hot Isostatic Pressing (HIP) procedure.
Therefore, any subtractive surface finishing operation should improve mechanical and corrosion resistance if a post-processing heat treatment capable of remediating the sub-surface porosity, such as HIP, is performed beforehand.
Many of the potential post-process methods for the improvement of surface texture are inapplicable for AM components, because of the technology’s freeform capability and resultant complex geometries, including internal passages, cavities and channels.
The reported work has focused on the effects of surface finishing of PBF-built metal components, using a combination of technologies that have demonstrated the potential to eliminate or reduce surface-related defects, involving chemical-mechanical polishing. Examples of such finishing treatments for Electron or Laser Beam Powder Bed Fusion (PBF-EB and PBF-LB, respectively), were showcased to demonstrate the process’s capabilities. Case studies for PBF-EB Ti-6Al-4V, PBF-LB GRCop- 42, and PBF-LB IN625 were selected as examples.
The specimens used for the study were additively manufactured vertically (90° with respect to the building platform) using the two different PBF types. Specimens were additively manufactured with and without contours.
The surface finishing process was performed by REM Surface Engineering, using their Extreme ISF Process®. This process combines a chemical polishing (CP) operation followed by a chemical mechanical polishing process (CMP). The CP was performed by immersion in a robot controlled chemical polishing bath. The CMP was performed in a 30 L circular vibratory bowl with a mix of non-abrasive ceramic media. The chemistry and dosing used for CP and CMP, as well as the media mix composition, shapes, and sizes, are the proprietary information of REM Surface Engineering and were not disclosed in the presentation.
Turning to the first of the case study examples, Fig. 2 shows the surface texture progression during the CP process of an PBF-LB (Ti-6Al-4V) specimen with porosity problems at the contour/hatching overlap region. It can be observed that most of the surface-related defects were remediated during the first 100 μm of surface metal removal (SMR) (Fig. 2, top right). The partially sintered/melted powder was eliminated and the surface profile peaks were partially planarised. Further processing eliminated most of the peaks. The deep valleys that were still present were significantly shallower and rounded, with a considerable planarisation level at 150 μm of SMR. At 175 μm of SMR, porosity associated with an unsuccessful overlap between the hatching pass and the contour was uncovered. This could usually be remediated with further processing at the expense of more sacrificial metal. This type of problem can be prevalent if extra care is not taken during the build process. Nevertheless, using a relatively inexpensive, fast, and easy CP process can check if some problems like this, or lack of fusion at the near-surface, occurred during the manufacturing process.

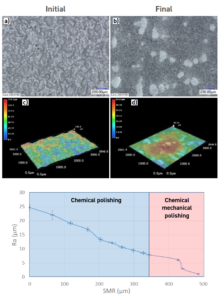
Fig. 3 Microscope images at 100 X magnification (a and b) with their 3D representations (c and d) of the surface of PBF-EB Ti-6Al-4V as-built tensile specimens, and the final surface after surface finishing (b and d). Average surface roughness (Ra) progression per surface material removal through the surface finishing operation (bottom). The blue area on the plot shows the CP progression and the red area shows the CMP progression [1]

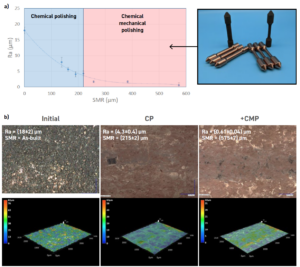
Fig. 4 Average surface roughness (Ra) reduction per surface material removal through the surface finishing operation of PBF-LB GRCop-42, first CP followed by CMP (a). The blue area on the plot shows the CP progression, and the red area shows the CMP progression [1]
The second case study focussed on PBF-LB GRCop-42 (Cu-4%Cr-2%Nb). GRCop-42 is a high-strength, dispersion-strengthened copper alloy with excellent conductivity, currently used in liquid rocket engines by NASA and other commercial space companies. Fig. 4 shows the surface texture progression for typical non-HIPed specimens of this alloy through the surface finishing operations. The as-built components show surface texture features overtaken by the partially sintered/melted powder on the surface, with Ra = (18 + 2) μm. The initial surface texture improved remarkably through the CP process; in this specific example, by removing around 200 μm from the surface, a Ra reduction of up to 78% was achieved; followed by the CMP process, reaching the lower possible Ra, where values under 0.6 μm were achieved (Fig. 4).
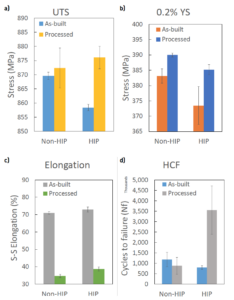
Finally, the PBF-LB IN625 case study was considered. The surface texture optimisation was performed by removing 400 μm from the surface by CP followed by 100 μm by CMP. The initial surface roughness of the as-built specimens was Ra = (8.3 + 0.5) μm and Ra = (7.5 + 0.2) for the HIPed samples. After applying CP + CMP, the final surface roughness was Ra = (1.1 + 0.6) μm for the non- HIPed samples and Ra = (0.07 + 0.01) μm for the HIPed samples. The non-HIPed sample surfaces showed significant shallow pits from the overall porosity, while the HIPed samples‘ surfaces were perfectly smooth.

Fig. 5 Tensile strength (a), 0.2% yield strength (b), elongation (c), and uniaxial tensile high-cycle fatigue (Load at 434 MPa, room temperature, R = 0.1, and 60!Hz) of PBF-LB IN625 specimens before and after surface finishing and HIPing [1]
Bitte füllen Sie das folgende Formular aus, um die gewünschte Ressource zu erhalten